Rube goldberg Project
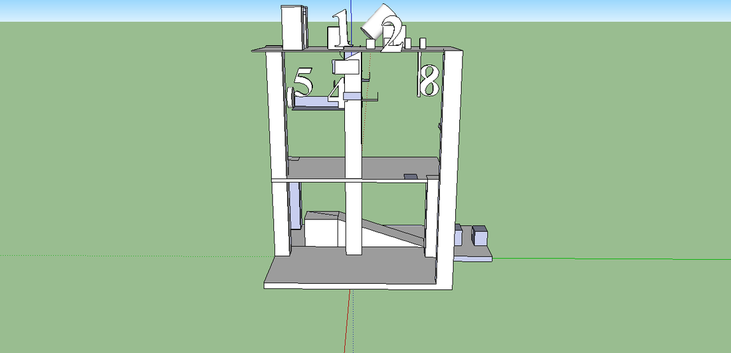
Sketch up

Rube Goldberg
In this project we built Rube Goldberg. A Rube Goldberg is a complicated machine that does are really simple task. What we did is we made our Rube Goldberg push a button that changed the pattern on Christmas lights. Along with this project we learned how to do all kinds of calculations which we then used to find out different things about our Rube. We calculated the velocity, potential energy, kinetic energy, etc. We also made a sketch up which is just a model of the Rube on the computer.
Rocket Project
Rocket Project.Day 6 entry 1: Today we are cutting bottles and shrinking them to fit into another. Eno talked to Dave yesterday so we have boiling water to dip each piece in. I cut each bottle to prepare for gluing.
Day 7 entry 2: I am going to glue two bottles together while my partner searches for a hinge to deploy the parachute. After I was done piecing together the pressure chamber I joined Eno to look for a hinge. We had no luck so we will have to look again tomorrow.
Day 8 entry 3: It’s Monday and over the weekend we collected more bottles and now we are cutting them again. The rocket now has each piece of the fuselage but isn't put together. We plan to finish it tomorrow.
Day 9 entry 4: Each bottle is glued together now but the rocket isn’t straight. We chopped the rocket in half and substituted a new bottle to make it longer and straight.
Day 10 entry 5: Today was a launch day, we didn't have fins or a parachute for the rocket but decided to launch it anyway. It flew to the left but feathered on the way down so it didn't get harmed.
Day 11 entry 6: After the launch Eno and I decided to make a parachute for the rocket. we cut out a plastic bag and tied string to the chute and the rocket. Next me made a nose cone to fit over the parachute.
Day 12 entry 7: Its Friday and we are working on completing the parachute deployment system. Eno worked on taping the flap to the hinge than glueing it to the rocket. I made the rubber bands connecting the nose cone to the other parts.
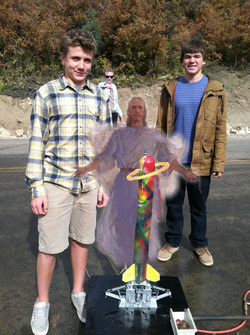
Day 13 entry 8: This is the final work day. Eno is making the fins while I painted the rocket. Toward the end of class we glued on the fins and the rocket is complete!
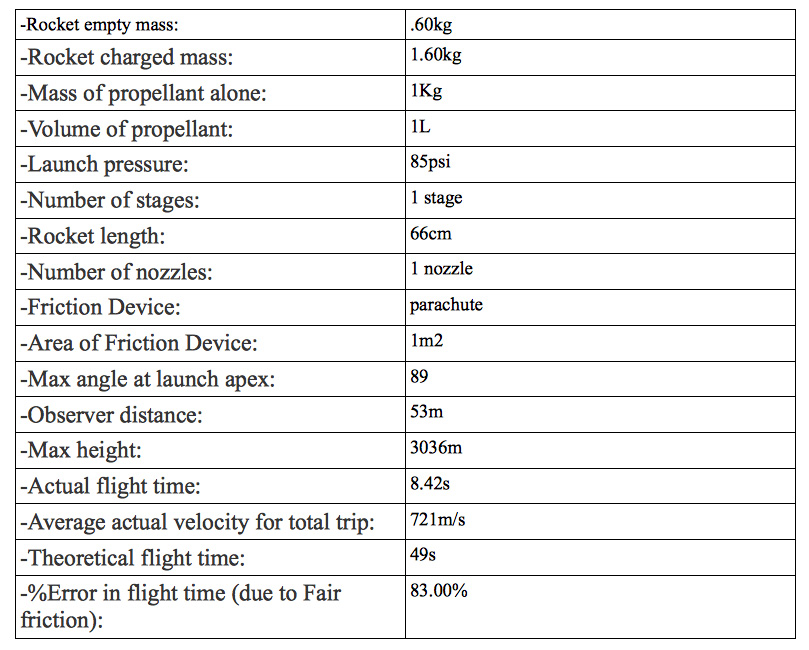
Rocket Data Table.
Day 7 entry 2: I am going to glue two bottles together while my partner searches for a hinge to deploy the parachute. After I was done piecing together the pressure chamber I joined Eno to look for a hinge. We had no luck so we will have to look again tomorrow.
Day 8 entry 3: It’s Monday and over the weekend we collected more bottles and now we are cutting them again. The rocket now has each piece of the fuselage but isn't put together. We plan to finish it tomorrow.
Day 9 entry 4: Each bottle is glued together now but the rocket isn’t straight. We chopped the rocket in half and substituted a new bottle to make it longer and straight.
Day 10 entry 5: Today was a launch day, we didn't have fins or a parachute for the rocket but decided to launch it anyway. It flew to the left but feathered on the way down so it didn't get harmed.
Day 11 entry 6: After the launch Eno and I decided to make a parachute for the rocket. we cut out a plastic bag and tied string to the chute and the rocket. Next me made a nose cone to fit over the parachute.
Day 12 entry 7: Its Friday and we are working on completing the parachute deployment system. Eno worked on taping the flap to the hinge than glueing it to the rocket. I made the rubber bands connecting the nose cone to the other parts.
Day 13 entry 8: This is the final work day. Eno is making the fins while I painted the rocket. Toward the end of class we glued on the fins and the rocket is complete!
Rocket Data Table.
Rocket Summery.
I think that through out this project my partner and I had a good working relationship that resulted in an awesome rocket. We made a revolutionary parachute deployment system that worked well until the actual exhibition. It was really cool to be a part of developing it. Throughout this project we learned about Newtons Law’s and acceleration as well as how rockets work. If I could go back and change something about our rocket I would put one more chamber on the rocket so that the rocket could have gone higher. Another thing that I would have done is focus on making my rocket as light as possible so that I could have maximized my flight time.
Next year I would give the advice to the freshman to spend lots of time getting good seems making a big chamber so you can go much higher. Another piece of advice that I would give to an oncoming freshman would be to not over look the parachute part of the project. The reason that this is important is because you can’t win the competition unless you have some way of making the rocket slow down. The last piece of advice that I would give to a freshman would be to make sure that you make your rocket out of good plastic and make sure that the bottles don’t have funny shapes.
Conclusion.
When we launched or rocket the observation table was exactly 53 meters away from where the launch pad was and our rocket flew to an able of 89%. Taking the angle of the rocket were able to find the max height that our rocket flew using basic trigonometry. The equation that we used was 53(the distance of the observation table from the launch pad) times tangent of the angle that our rocket flew equals the max height in meters. Once you get the max height you can also find the average speed and velocity, how you do this is you take your max height and multiply it by two. You do this because you have to account for the fact that it went up and then down, doubling the distance. The next step is to take your height doubled at divide it by your time, this will give your your velocity in meters per second. After that, we calculated different flight times. The first was the actual flight time which was 6.85 s. Our theoretical flight time was 8.6567 s. Both of these times had some error from our friction device (parachute) of 21%. Our error percent was pretty low and I think this is due to the fact that our parachute only partially deployed. This caused very little friction when our rocket was falling towards the earth.
